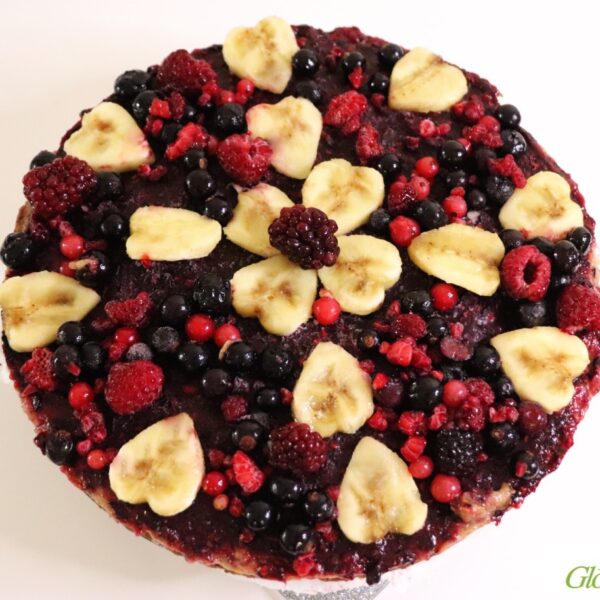
Raw Vegan Banana-Berry Cake
Enjoy this delicious and healthy raw banana-berry cake. This cake is simple to make, easy to digest and extremely delicious. With this delicious and healthy cake, you get the opportunity to enjoy sweet flavors without feeling guilty.
Equipment
- knife
- cutting board
- protective cutting glove
- mixing spoon
- spatula
- cookie cutter
- parchment paper
- scissors
- cake mould
- dehydrator
- food processor
- Blender
- freezer
- citrus press
- food storage box
Ingredients
Ingredients - Big Cake Mould
Crust - Big Cake Mould
- 500 g 18 oz dates
- 100 g 4 oz raw carob powder *The amount of carob powder depends on how juicy or dry the dates are. The juicer the dates are, the more carob powder is needed to "bind" them into a "dough".
The First Layer - Big Cake Mould
- 4 big bananas
- 4-8 tbps ground dried apples - "apple flour"
The Second Layer - Big Cake Mould
- 200 g 7 oz berries *You can use whatever berries you want: raspberries / blueberries / strawberries / mixed berries
- 2 tbsp ground dried apples - "apple flour"
Decoration - Big Cake Mould
- 1/2 banana
- 50 g 2 oz berries
Ingredients - Small Cake Mould
Crust - Small Cake Mould
- 100 g 4 oz dates
- 40 g 1.7 oz raw carob powder
The First Layer - Small Cake Mould
- 2 medium bananas
- 2 tbsp ground dried apples - "apple flour"
The Second Layer - Small Cake Mould
- 50 g 2 oz berries
- 1 tbsp ground dried apples - "apple flour"
Decoration - Small Cake Mould
- 4 slices banana
- 1 tbsp berries
Instructions
Making "apple flour"
- Plan on making this cake one day before the day you intend to serve it. Plus, one day before making the cake, dehydrate some apples. Order a high quality dehydrator HERE.
- Peel the apples.
- Destem and deseed the apples.
- Slice the apples.
- Place the apple slices onto dehydrator trays.
- Dehydrate the apple slices at 117 F / 47 C degrees for about 12 to 15 hours, or better say, until they become crispy.
- Assemble the large S blade in the food processor.
- Place the dehydrated apple slices into the largest bowl in your food processor.
- Close the food processor.
- Protect your hearing with ear muffs. Noise damage to the inner ear is accumulative. This means: better safe than sorry. Order high-quality ear muffs HERE.
- Transfer this apple flour into a Mason jar. Although, to be honest, a far wiser option is to store whole dehydrated apple slices in a jar, then grind smaller amounts into flour as needed. The reason is that whole foods last longer and they are more resistant to oxidation.
Making the crust
- Wash the dates.
- Depit the dates.
- When buying dates, make sure you choose dates that are free of glucose syrup, sulphates or preservatives. Buy dates that have no artificial additives added to them.
- Assemble the dough blade in the food processor. Order a high quality food processor HERE.
- Add the dates and some raw carob powder into the food processor.
- Close the food processor.
- Protect your hearing with ear muffs.
- Process the dates and carob powder until you get a dough-like mixture.
- While you process these two ingredients in the food processor, you will probably have to stop the food processor from time to time, to see how the dates and carob have combined and add more carob powder if necessary. Think of making dough, but using dates instead of eggs and carob powder instead of flour.
- Cover the bottom of a mixing bowl with some carob powder.
- Transfer the date-carob-powder dough from the food processor to this bowl.
- Put on hygienic gloves. Knead the dough, adding carob powder as needed. The goal is to get a non-sticky dough.
- Having kneaded the dough, now take a piece of parchment paper and a cake mold.
- Open the cake mold and place a piece of baking paper in the cake mold, so that it covers the bottom of the cake mold.
- Transfer the date-carob-powder dough into the cake mold. Spread it over the entire bottom surface of the mold, forming the cake crust.
Making the first filling
- Peel 4 large bananas.
- Cut one banana in half. Set one half of that banana aside.
- Chop the rest of the bananas.
- Add the chopped bananas and 4 tablespoons of dried apple flour into the blender jar.
- Protect your hearing with ear muffs.
- Blend these two ingredients into the filling.
- Transfer this banana-dried-apple filling onto the cake crust.
- Spread this filling over the entire cake crust with a spatula.
Making the decoration
- Prepare a heart-shaped cookie cutter (or any other shape you want) and one food storage box. Order cookie cutters HERE.
- Cut that one banana half you left aside earlier, into diagonal slices. I say diagonal slices because this will give you more surface area to shape these banana slices.
- Using a heart-shaped, or whatever shape you want, cookie cutter, make banana hearts.
- We will use these hearts to decorate the top layer of the cake.
- Transfer all the hearts you made to the food storage box.
- Cut the lemon in half.
- Banana and lemon together are not a good combination digestion wise, because sweet and acid together are not a good combination for digestion.However, here we just want to protect the banana slices from oxidation using just a few drops of lemon juice.
- Close this box with banana hearts and put it in the fridge. We gonna use these banana hearts to decorate the cake.
Making the second filling
- Place the berries and dried apple flour in a blender jar.
- Blend these two ingredients into a creamy filling.
- Transfer this dark purple filling over the banana layer.
- Using a spatula, spread this filling over the entire surface of the banana layer.
Cake tightening
- Close the cake mold with the lid.
- Place this cake mold in the freezer for about 8 hours.
- Take the cake mold out of the freezer and now put it in the fridge so that the cake thaws, but still stays firm and keeps its shape.
- After an hour, take the cake mold out of the fridge. Also, take out the plate with berries and the box with banana hearts.
Decorating the cake
- Decorate this cake with the banana hearts and the rest of the berries for this cake however your heart desires.
Serving the cake
- Cover the cake mold again, put it back in the fridge and keep it in the cake mold and in the fridge until about half an hour before serving the cake.
- Take the cake mould out from the fridge.
- Open the cake mould.
- Using a knife and a cake spatula, slice the cake and serve one cake slice at a time on a plate.
Enjoy!
Enjoy Raw Vegan Cuisine
with the Raw Vegan Culinary Set